
Router Refresh: Netgear R7800 as a torrenting NAS and PXE server with LEDE
Posted by Jack on 2018-02-17 at 00:59Tagged: hardware , linux
More than a few years ago, I invested in a Netgear WNDR 3800. I intentionally bought it because it was supported by OpenWRT, a Linux based firmware, similar to DD-WRT and capable of running a lot of extra services at the center of your network.
Time marches on however, and despite the fact that the WNDR 3800 was the Rolls-Royce of routers five or six years ago, it started to show its age. It's 680 Mhz MIPS processor wasn't beefy enough that I could run a VPN endpoint on the router with any amount of bandwidth, for example, but the main reason for an upgrade was its lack of support for 802.11ac, which was standardized after the 3800 was on the market, much less 802.11ac "wave 2" which is the current best option.
In the meantime, I also became an AMD employee and suddenly had an embarrassing array of Intel processors sitting on my home network. While I can't reasonably go out and replace every machine in the name of some sort of ideological purity (although I did promptly build a Ryzen 7 1700X rig for myself), eliminating some of these Intel devices has a certain appeal to me. Case in point, the little Celeron machine serving as a NAS. At one point this box ran a desktop on the TV via HDMI, controlled by Synergy, SSH, Kodi, or PS3 controllers over a Bluetooth dongle. Since then we've started using Steam Links which covers the HDMI/controller case much, much better so the Celeron basically existed just to run the RAID, Samba, Transmission, and Sonarr. None of which requires a particularly beefy machine, or HDMI any longer.
So, to upgrade my home network and potentially eliminate a redundant machine, I decided it was time to throw down on a new router setup and, to keep this from being an unmaintainable mess as soon as I've moved on, I figured I'd document how I set everything up.
The Hardware
I initially looked at some Ubiquiti hardware. The Power-over-Ethernet single cable approach was appealing, as were the sleek interfaces, but it's clear those devices are designed for scale out that I didn't need, and wouldn't be much help for replacing a NAS either.
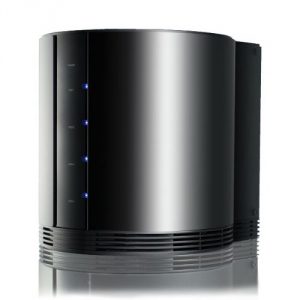
So I settled on the Netgear R7800 "Nighthawk X4S" which looks a bit like a stealth bomber.

I'll admit I was showing a bit of favoritism to Netgear after my 3800 was such a workhorse, but so far it's been a good choice. Instead of a rickety 680 Mhz MIPS, this bad boy came with a two thread 1.7Ghz ARMv7 processor and 512M of RAM. Dual USB 3.0 ports (or eSATA if you prefer). 802.11ac wave 2 support. Pretty standard wired networking (4xLAN 1xWAN).
I paid about $220 for it at my local Fry's (similar prices on Amazon/Newegg) and while it's not objectively the best router on the market, I didn't feel the extra features of some of the more expensive models warranted the extra cost. Most of them have similar processors and RAM sizes, similar ranges etc. Most importantly, however, the R7800 has pre-built OpenWRT images.
I also purchased a HornetTek four bay SATA enclosure that supports USB 3.0.
I hadn't ever heard of HornetTek but SATA enclosures are simple devices and so far it's worked admirably. It doesn't do any sort of hardware RAID or anything, it just enumerates the four drives separately. I chose it specifically because it had four bays instead of two which would allow me to run my 2x2TB RAID devices along with a single 120G SSD.
LEDE
I won't cover the basics about router setup, running ethernet cables, plugging in the enclosure etc. It's all rather common knowledge and if you can't figure out that part based on the diagrams that came with your router, then you need a much more basic page than this one, trust me.
Once your router is online running the factory firmware, the first thing you want to do is install LEDE, which is now the parent project of OpenWRT. The switch is simple, just make sure you grab the right model and choose a -factory.img from their download page which you can then install using the factory firmware's firmware upgrade mechanism.
Caveat 1: Snapshot Images
Here's the first little bump in the setup. Later, we'll want to use a standard Linux tool, mdadm to setup our RAID. Unfortunately, the existing release of LEDE (17.01.4 from October 2017) doesn't include kernel support for "direct IO" that is required for software RAID. The wise developers of LEDE have corrected this minor issue in the meantime, so while we wait for the next official release, the snapshot releases work ... for the most part. The issue is that snapshots don't include the web interface, LUCI, but to access the router via SSH you need to have a password configured... which you can only do through the web interface on a fresh install. As a result, until the next official release you may need to install a release image, set a password, then install a sysupgrade image for a snapshot. Then you can SSH into the router and install luci with opkg update; opkg install luci.
Once you've installed LEDE, you can tweak all of the standard router knobs. WiFi SSID, encryption, static DHCP leases etc.
RAID
With the drive bay plugged in and powered on, we need the USB storage kernel modules to enumerate the devices, mdadm as well as kernel support for RAID.
$ opkg update
...
$ opkg install kmod-usb-storage mdadm kmod-md-raid0 kmod-md-raid1
With my setup, I have two 2TB drives. Each drive has two partitions. A small rare-use backup partition that is RAID1 (mirrored) across the drives, and a larger RAID0 (striping) partition I use for torrents. The idea being that if a drive fails the (replaceable) torrents are toast, and I can recover the backup off of the remaining disk. This isn't ideal from the point of view that I'm putting wear on both backup disks that may fail around the same time, but this backup is in turn backed up on other machines.
Anyway, with the proper modules installed, this is my drive setup:
| Device | Partition 1 | Partition 2 |
| sda | swap | extra |
| sdb | backup | torrents |
| sdc | backup | torrents |
Creating a RAID
There are a ton of resources to teach you how to create a RAID with mdadm. I used the information in the ever-useful Arch wiki on RAID installation. The short version, however, is that you install a number of disks, partition them identically (or as nearly as possible), and then use mdadm to create the array. I created my array previously, so I haven't done this in a LEDE environment, but if I just had the disks partitioned I would have created my arrays with these commands:
$ mdadm --create --verbose --level=1 --metadata=1.2 --raid-devices=2 /dev/md0 /dev/sdb1 /dev/sdc1
$ mdadm --create --verbose --level=0 --metadata=1.2 --raid-devices=2 /dev/md1 /dev/sdb2 /dev/sdc2
After the initial creation the raid devices (i.e. /dev/md0) are just like standard block devices, so you'd throw a filesystem on them (mkfs.ext4 /dev/md0) and mount them as usual.
Configuring mdadm
There is no LUCI integration for mdadm, so I hand configured this in /etc/config/mdadm
config mdadm
        option email root

config array
        option device /dev/md0
        option name archiso:0
        list devices /dev/sdb1
        list devices /dev/sdc1

config array
        option device /dev/md1
        option name archiso:1
        list devices /dev/sdb2
        list devices /dev/sdc2
I don't think the name is important, but I transferred the same name from when my RAID was created (unsurprisingly during an Arch install, thus the name). I also would have preferred to use UUIDs from my old mdadm.conf but that brings me to another issue. I'm not even certain the above configuration is correct because..
Caveat 2: mdadm segfaults
This may be an issue with the mdadm packaged in the snapshot tree, but anytime I ran any command mdadm that parsed a config, it segfaulted. The mdadm.conf that the LEDE mdadm package creates based on the above LEDE config appears to be correct, but the init script just assumes everything worked out when invoking it. I haven't spent any time trying to figure out who is "responsible" for this, whether it's mdadm being broken, any LEDE patches, or if this segfault is just a weird symptom of the kernel missing some sort of support (which is how the lack of direct IO support revealed itself).
To avoid parsing a config file, I thought about editing /etc/rc.local, but that code is only invoked after the other init scripts are run, and I want the RAID running before other init scripts like Samba or Transmission start running. So, as a really shitty hack, I edited my installed copy of /etc/init.d/mdadm and replaced a line that does the final invocation with two lines that manually start the RAID devices without parsing a config.
        # $PROG --assemble --scan --config="$CONF"
        $PROG --assemble /dev/md0 /dev/sdb1 /dev/sdc1
        $PROG --assemble /dev/md1 /dev/sdb2 /dev/sdc2
Once I'm running an actual release version of LEDE instead of snapshots, I'll take a closer look at this.
Automounting
Once mdadm has been properly configured (or horribly hacked, depending) we can setup mount points. Fortunately, LUCI has native support for this if you install the block-mount package with opkg install block-mount. Once that's been installed, you should see a "Mount Points" option underneath the "System" tab in LUCI, which will take you to a screen where you can add mounted filesystems. Here's an example shot of my setup:
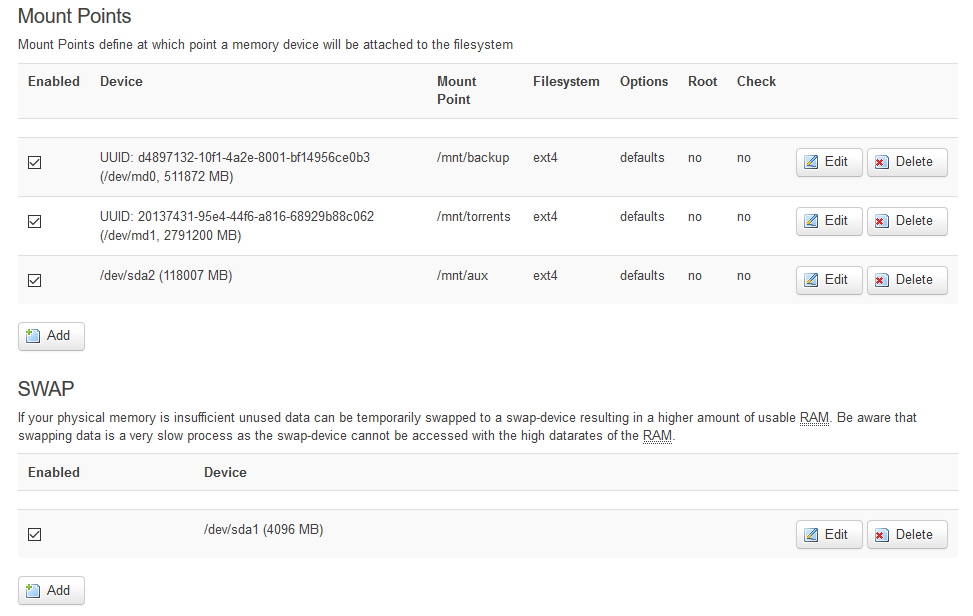
As you can see, I've got two RAID mounts at /mnt/backup and /mnt/torrents, along with a small SSD that's providing the 4G of swap space (to be safe) and an extra partition that we'll use later to host TFTP/NBD files as well as running Sonarr.
At this stage, you should be able to reboot the router and have the RAID come up and get mounted automatically.
Transmission
My next step was to get the router to deal with torrents. Fortunately, this is a very common usecase for LEDE and it's well supported. I use the web interface and the RPC API (to communicate with Transdroid, an Android torrent app).
$ opkg update
$ opkg install transmission-daemon-openssl transmission-web luci-app-transmission
For the most part, the default selections for Transmission are good. It's configured to allow connection from LAN addresses without a password. With the LUCI app installed, there's a new option "Transmission" under the "Services" tab that will let you set the download directory to your USB storage (i.e. /mnt/torrents in my case). The settings do seem a little conservative however. I upped the cache to 16M from 2M to give Transmission a bit more memory to fill before hitting the disk, for example, just because I still have quite a bit of headroom in my 512M of RAM.
Once you've pointed Transmission to your torrent drive, it should be good to go.
One thing to take note of with Transmission is that by default its configuration directory is under /tmp and this is lost on reboot. This includes any settings you set from outside LUCI through the Transmission interface itself, as well as all of the accumulated torrents you've uploaded. In general this isn't an issue, but if your router goes down be prepared to re-upload torrents to complete them or meet any tracker seeding requirements. If this is a problem, you can shift the Transmission config directory to a real disk instead of /tmp.
Make sure that your torrents directory is writable by transmission as well:
$ chown transmission:transmission -R /mnt/torrents
$ chmod ug+rw -R /mnt/torrents
At this point, you should be able to upload a torrent via the web interface at 192.168.1.1:9091.
Samba
Now that you have a disk to fill up, you need to be able to share all those files. Fortunately, LEDE has great support for Samba which most operating systems and media players support to some extent. Simply install Samba and the corresponding LUCI app.
$ opkg update
$ opkg install samba36-server luci-app-samba
Now, under LUCI's "Services" tab, there's a "Network Share" option where you can configure individual shares. Here's a shot of my setup:
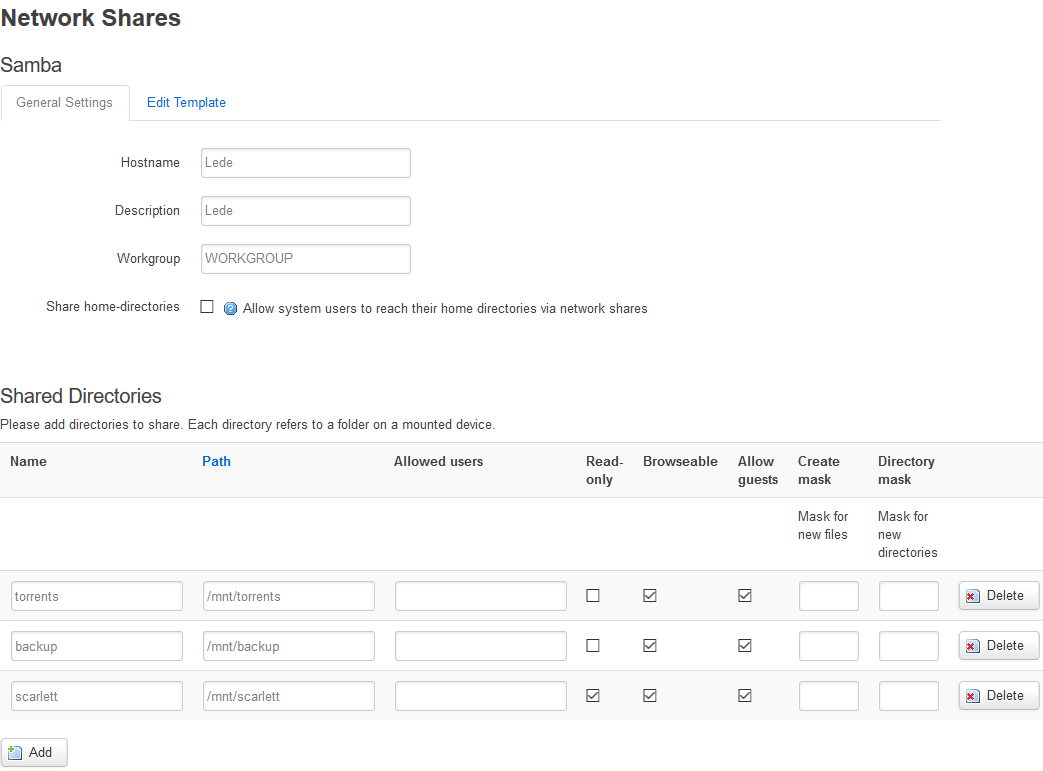
Pretty straightforward, enabling guest access to each share.
Caveat 3: Permissions
One issue I ran into was ensuring that Samba guests and Transmission both have full access to the drive. By default, Samba maps the guest user to the group-less 'nobody' user that won't have permissions to write the torrents directory by default. I chose to edit the template, either through the "Services" -> "Network Shares" -> "Edit Template" box, or by directly editing /etc/samba/smb.conf.template to set
guest account = transmission
Fortunately, this template is preserved during sysupgrade. Initially, I just made the torrents directory owned by nobody:transmission as a sort of compromise, but the files created by Transmission are owned by the transmission user by default so it caused me to lose write access through Samba guests after I did the initial manual chown.
At this stage, you should be able to access your torrents through your standard SMB capable programs. Kodi. Nautilus/Nemo. Windows Explorer etc.
Sonarr
Here's where we deviate from the well worn path of LEDE. Sonarr is a great web app for tracking TV shows, watching schedules and automatically downloading torrents from your configured trackers (or Usenet). Unfortunately, it also depends on Mono and some other dependencies that are way out of scope for LEDE packages. I'm not a fan of Mono, but Sonarr is a massive leap up from other solutions like Sickrage in my experience.
So, since we're moving well out of the router wheelhouse, and I don't want to do something crazy time consuming like packaging Sonarr and all of its dependencies myself, we're going to rely on our old friends at Debian to do the heavy lifting for us with their armhf port.
Setting up a Debian chroot
Fortunately, the LEDE developers make this really easy. The first step is to install debootstrap, which already has a package.
$ opkg update
$ opkg install debootstrap
Then, we install our pocket Debian. I chose the Debian rolling release, 'sid' because I'm very comfortable with Debian if it breaks, but you may want to stick to 'jessie' or 'stretch' for their latest official release, or the upcoming one. Frankly, I don't imagine I'll be updating this chroot very often so release isn't that important, but I can vouch for 'sid' including all of the Mono dependencies I needed.
I have my 116G ext4 partition mounted at /mnt/aux, separate from my RAID/Transmission/Samba setup. Debian chroots are pretty lightweight when you only install one thing, even pulling the entire Mono ecosystem my current chroot is under 2G. Obviously far too big for router flash but hardly a real issue for average sized USB storage. There's also nothing keep us from hosting this chroot on RAID devices either, I just happened to have a spare disk since I was scrapping a machine.
$ cd /mnt/aux
$ debootstrap --arch=armhf sid debian
Note that armhf is the proper architecture for the IPQ806x in the R7800 and I imagine for all of the other recent embedded ARM variants until arm64 filters down to routers, but it's possible that your router has a different architecture, so choose wisely.
This will take a bit.
As an aside, the strategy of chroots is very useful as a sort of primitive proto-container like this and with a little more legwork we could theoretically run all of our other daemons out of this Debian environment as well. For the most part, there really isn't a reason to - the packages provided with LEDE are sufficient and minimal - but if you needed a newer or heavier version of something (say Samba 4 instead of Samba 3.6, or a full blown mail server) it saves you a lot of effort to just graft in a working system than if you homebrewed your own packages.
Once debootstrap completes, I recommend mounting some filesystems into it
$ mount /dev /mnt/aux/debian/dev -o bind
$ mount /dev/pts /mnt/aux/debian/dev/pts -o bind
$ mount /proc /mnt/aux/debian/proc -o bind

$ mkdir /mnt/aux/debian/mnt/torrents
$ mount /mnt/torrents /mnt/aux/debian/mnt/torrents
The first three mounts just make sure that /proc, /dev, and /dev/pts are present so that programs in the Debian chroot won't get confused if they rely on any of these virtual entries, or try to create pseudo-terminals. Without these mounted, you can end up with many different types of misbehavior. Mono, for example, won't even try to run if /proc isn't mounted. Debian's apt-get will complain about missing /dev/pts as well, and some package installation scripts may fail depending on how finicky they are about such things.
In theory, we should bind mount /sys as well, but in my experience that's unnecessary.
The last mount is to make sure that the torrent drive is accessible to Sonarr, which will import and rename items for you if it can. If you just want Sonarr to dispatch torrents and not manage the downloaded files this is probably unnecessary.
Now you should be able to enter the Debian environment like this:
$ chroot /mnt/aux/debian /bin/bash
You need to specify /bin/bash because the LEDE busybox shell is actually ash. Once you're in the chroot, make sure apt-get is operational.
chroot$ apt-get update
chroot$ apt-get upgrade
You shouldn't have an upgrades since you just installed it, but it should gracefully tell you so.
Installing Sonarr
Now the easy part. Thanks to the Sonarr devs, their site includes instructions to install on Debian which you can follow verbatim.
Start by adding the Sonarr public key to your chroot's keyring and their repository to your apt sources.
chroot$ apt-key adv --keyserver keyserver.ubuntu.com --recv-keys FDA5DFFC
chroot$ echo "deb http://apt.sonarr.tv/ master main" > /etc/apt/sources.list.d/sonarr.list
Then you're read to actually install Sonarr, which is still called nzbdrone after the initial Usenet implementation.
chroot$ apt-get update
chroot$ apt-get install nzbdrone
Running Sonarr
From outside the chroot (use 'exit' if you're still in it) you can always chroot into Debian for just one command instead of invoking a shell.
To integrate the chrooted Sonarr with LEDE, just paste the following text into /etc/init.d/sonarr
#!/bin/sh /etc/rc.common

START=99
USE\_PROCD=1

start\_service() {
        mount /proc /mnt/aux/debian/proc -o bind
        mount /dev /mnt/aux/debian/dev -o bind
        mount /dev/pts /mnt/aux/debian/dev/pts -o bind
        mount /mnt/torrents /mnt/aux/debian/mnt/torrents -o bind

        procd\_open\_instance
        procd\_set\_param command chroot /mnt/aux/debian env HOME=/root /usr/bin/mono /opt/NzbDrone/NzbDrone.exe
        procd\_close\_instance
}

stop\_service() {
        procd\_kill "sonarr" "$1"
        umount /mnt/aux/debian/proc
        umount /mnt/aux/debian/dev/pts
        umount /mnt/aux/debian/dev
        umount /mnt/aux/debian/mnt/torrents
}
Then Sonarr should show up as a service in LUCI's "System" -> "Startup" screen at the very bottom along with Transmission and any other lower priority init daemons.
A few notes on the init script. We need to invoke mono with env so we can set $HOME properly and Sonarr will properly choose /root/.config instead of the completely inappropriate /.config. This may not be strictly necessary, but it means that if you chroot into the Debian environment and run mono by hand, you get the same result as starting it with this init script. Also note that the stop\_service() manually kills Sonarr so it won't be occupying our mounts. This ensures we can properly unmount but it's also probably not good practice. I did attempt to add the virtual filesystem mounts to the official LEDE storage mount point system (what we used above for the RAID devices), but it didn't like the bind as written, so I just added it here where I have full control over the command invoked.
To keep this service intact after a sysupgrade, we can add it to /etc/sysupgrade.conf
## This file contains files and directories that should
## be preserved during an upgrade.

/etc/init.d/sonarr
Configuring Sonarr
With Sonarr running, you can access its web interface from 192.168.1.1:8989 and because it's in the Debian chroot, all of its internal settings will be persistent.
Other resources have covered setting up Sonarr (like the Sonarr Wiki), but the short version is that you want to setup at least one Indexer (source of torrents found under System -> Indexers). These will encompass most of the major private TV trackers and you'll likely need to paste an API key into their configuration. Sonarr provides a convenient "Test" button that will do a basic sanity check without actually downloading anything.
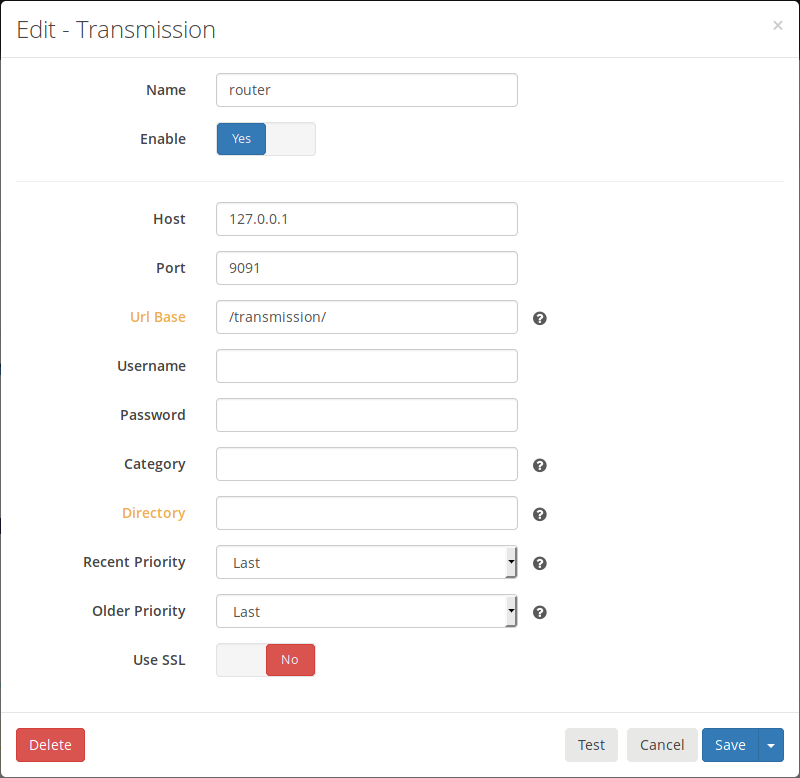
After you have an indexer setup, add a Download Client (under System -> Download Clients) for your local Transmission server:
Once you've done that, you're all set to start adding shows you're interested in. The search is under "Series -> Add Series" and will allow you to add each series with options for the desired profile. I suggest starting with a 720p profile by default and updating to 1080p for any series you think are worth it. Personally, spending 50G downloading 1080 Blu-ray rips of an office sitcom seems like a waste. Especially when...
Caveat 4: Sonarr double disk space
One flaw with Sonarr is that it's hard to balance the desire to organize and rename files with the need to seed consistently. In theory, Sonarr supports hard-linking files instead of copying them (which would allow the filename to be different without having an extra copy of the data) but I have not seen this actually work. I just make sure I go through and cleanup my torrent list every once in awhile.
There are two options I want to point out though. The first is that you don't necessarily have to use Sonarr to organize at all by disabling "Completed Download Handling" in the download client settings, this keeps Sonarr from copying files and it will operate only as a torrent dispatcher. The second option is that you can enable "Ignore Deleted Episodes" in the "Media Management" settings. This will allow you to hand delete series you're done watching without Sonarr freaking out and re-downloading them.
In my setup, I chose to allow Sonarr to import/rename everything, but to ignore deleted episodes. I go in and clear my torrents on a regular basis and if I need to free up further space, I go and delete shows I'm not actively watching.
Sonarr is pretty intelligent about downloading as well. When you add a series, it will ask you what part of the series you want to "monitor" and this monitoring determines whether Sonarr will automatically download that series. New episodes are automatically monitored, but for the purposes of trying out shows monitoring the first season is plenty, or if you've caught most of the latest episodes but are a bit behind, just grab the last season, or just future episodes. After adding, this monitor status is indicated with the little banner icon on the individual show pages.

In this screen, the season is monitored (indicated by the big black banner icon), but each of the individual episodes aren't (small white banner icons) so Sonarr will attempt to download the whole season. If the season was unmonitored, but an episode was, Sonarr would attempt to download the episode alone first, and then fallback on the season if there was no other option.
Anywhere you see a magnifying glass icon, you can manually initiate a search for a specific torrent, and if you click the little head and shoulders icon, it will even let you manually select a release. Both of these can be extremely useful if you're in a hurry, or to debug why Sonarr picked a specific release over another.
Sonarr can be a tad idiosyncratic however. One little annoyance I have with it is that whenever you add a series, the options you choose (quality profile, season folder settings, etc.) become the defaults for the next series you add. So if you add a daily news show once, the next time you add a series, it will default to a daily show. It's not the end of the world, of course, but you just need to be careful, especially when doing the initial setup adding multiple shows.
PXE
Moving away from the entertainment sphere, I wanted to be able to PXE boot a Linux install image. For those unfamiliar, PXE (Pre-eXecution-Environment) is a nice, BIOS enabled method to DHCP a wired network interface, fetch a specific file and boot it. This can be quite useful for accessing live distros without a DVD or a USB.
In my case, my work laptop is disappointingly locked down. The BIOS options to boot to USB are disabled, and Windows' laughable disk encryption Bitlocker apparently doesn't play nice with UEFI booting so it's forced into legacy mode. To install Linux, I had to resize the encrypted partition (which required talking to IT for some bullshit passcode to unlock afterward), then PXE boot Arch. Because of being forced into legacy BIOS mode, installing a Windows update is like playing Russian roulette with my bootloader. Point being that I need a PXE server every time Windows randomly borks my disk, and since PXE is intrinsically linked to DHCP the router is the prime location to set it up.
Most of this setup was cribbed from the OpenWRT page for PXE booting, combined with some Arch specific settings on the Arch wiki page for PXE.
syslinux
Before we configure our PXE server, let's setup a directory to serve. I decided to use more of the auxiliary SSD mounted at /mnt/aux to serve Syslinux's PXELINUX, a PXE bootloader capable of loading Linux kernels through the DHCP connection negotiated by the PXE. I downloaded Syslinux 6.03 and untarred it, then copied the binary implementations directly out of the release and into /mnt/aux/tftp, the root of my soon-to-be TFTP server.
$ cd /mnt/aux
$ mkdir tftp
$ wget https://www.kernel.org/pub/linux/utils/boot/syslinux/syslinux-6.03.tar.gz
$ tar -xzf syslinux-6.03.tar.gz
$ cd syslinux-6.03/bios
$ cp core/pxelinux.0 com32/elflink/ldlinux/ldlinux.c32 com32/menu/vesamenu.c32 com32/lib/libcom32.c32 com32/libutil/libutil.c32 /mnt/aux/tftp
The important files here were identified in the OpenWRT wiki, but it includes the basic binary (pxelinux.0) as well as enough support to display a nice menu and boot Linux.
DHCP/TFTP
Unsurprisingly, one place the LEDE project didn't spare any expense (in terms of configuration options, at least) was in its DNS/DHCP server, dnsmasq. dnsmasq includes a basic TFTP server implementation that we can enable directly in the LUCI interface under "Network" > "DHCP and DNS". There's a tab for TFTP settings you switch to and a few settings.
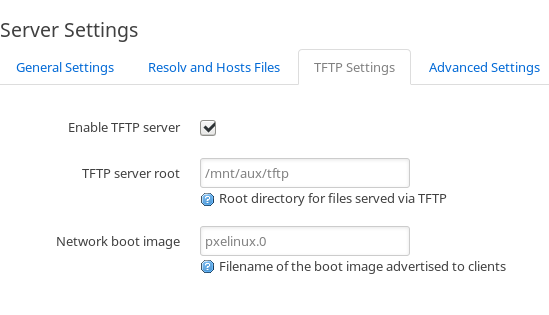
Once you enable the TFTP server, you should be able to PXE boot a wired device (usually by rebooting and mashing F12 or some other BIOS hotkey) and it will get far enough to show you a GRUB like bootloader screen, without any options because you still need to configure PXELINUX.
Using an Arch ISO
Now that we have PXELINUX booting without a configuration, we need to give it something useful to do. I like to use Arch install media as a basic recovery tool or fresh installation environment. It has most of the relevant disk and crypto tools, and network support I need to nip in and fix a broken bootloader, or transfer things off of backup disks.
I torrent my copies of Arch install media, so the router naturally has access to the ISO in /mnt/torrents. My first stab at this, I thought I'd be clever and take advantage of this fact by serving the files out of a loopback mounted ISO, thus using no extra space. This turned out to be impractical because the LEDE mount point system doesn't appear to support loopback mounts any better than the bind mounts I tried for the chroot. So, instead of adding yet another temporary hack to /etc/rc.local or somewhere else, I decided to just unpack the ISO elsewhere and copy its contents into /mnt/aux/archiso.
Inside, there are a handful of notable files. The kernel and initrd we'll need PXELINUX to serve up for us is in archiso/arch/boot/x86\_64/, files vmlinuz and archiso.img. There's also the ISO's built in Syslinux configuration in archiso/arch/boot/syslinux, where we can see just what arguments Arch expects. Specifically, there are three options in archiso\_pxe.cfg that enumerate our network boot options. We can choose an HTTP boot, an NFS boot, or an NBD boot.
HTTP boot would be fine and in fact the LUCI interface depends on uhttpd so it would be convenient just to symlink the ISO directory to /www/archiso and call it a day, but this method didn't work on my system. Arch fetches files from the server with curl which will choke if there's an issue with SSL like having a self-signed certificate like the default uhttpd server advertises with the luci-ssl package installed. I don't care to mess with certificates that are basically unavoidably vague (you are visiting 192.168.1.1 after all) so I moved on.
NFS is a good, mature candidate but it's also extreme overkill in my opinion. We're only going to have one user at a time, read-only, we don't need most of the robust features offered by NFS.
Which leads us to NBD, which is less featureful, dead simple to configure, and provides better performance for our usecase anyway.
One advantage that NFS would offer would be the ability to just serve the unpacked archiso directory, compared to NBD which requires access to the .iso, but since I generally have a copy in /mnt/torrents anyway, that isn't much of an upside compared to the extra complexity and dependencies of NFS. I didn't perform any metrics on resource usage either, but it's hard for me to imagine that NFS would end up being lighter on resources than NBD especially when NBD is taking up about 500k of RAM and NFS has so many more bells and whistles. Anyway, I chose to go with NBD.
NBD
The NBD server is trivial to install and configure. Just grab the nbd-server package, and add your configuration to /etc/config/nbd-server.
$ opkg update
$ opkg install nbd-server
Here's an example of my /etc/config/nbd-server
config nbd-server
        option enabled 1

config share archiso
        option filename '/mnt/torrents/archlinux-2018.02.01-x86\_64.iso'
        option readonly 1
Just make sure the service gets started, and you're good to go. Unfortunately, this configuration does mean that we'll have to update this file if we update our Arch ISO, instead of just overwriting /mnt/aux/archiso with the new files.
Final PXELINUX Configuration
Now that we have everything we need unpacked and the NBD server is ready, we can put everything together into our PXELINUX configuration. First, we'll symlink the kernel and initrd someplace where the TFTP server will serve them up. I decided to just drop the symlinks in the TFTP root directory.
$ cd /mnt/aux/tftp
$ ln -s /mnt/aux/archiso/arch/boot/x86\_64/* ./
$ ln -s /mnt/aux/archiso/arch/boot/intel\_ucode.img ./
In the same directory, create a pxelinux.cfg directory, and in that directory create a default file. In there, we can paste our configuration.
DEFAULT vesamenu.c32
PROMPT 0
MENU TITLE OpenWRT PXE-Boot Menu

label Arch
        MENU LABEL Arch 2018-02
        KERNEL vmlinuz
        INITRD intel\_ucode.img,archiso.img
        APPEND archisobasedir=arch archiso\_nbd\_srv=192.168.1.1 iommu=off nomodeset ip=::
        TEXT HELP
                Arch install media, 2018-02
        ENDTEXT
This is mostly boilerplate, taken from the previously mentioned archiso/arch/boot/syslinux/archiso\_pxe.cfg, except the paths are all flat (files are in the TFTP root) and the NBD server has been subbed in. Note that the iommu=off and nomodeset options are custom because my laptop has a buggy IOMMU and its framebuffer gets scrambled if it tries to do early modesetting in the Arch ISO environment. You probably won't need these options, but if you do end up requiring custom options you don't want to hand insert from the Syslinux prompt, this is the place for them.
Once you have this file in place, you should be able to boot to an Arch ISO prompt over any typical computer wired into your LAN without messing with USB keys.
Final Thoughts
This is a work in progress. I'm a little disappointed that I had to hack mdadm's init script, but other than that most of this configuration should be bulletproof in terms of reboot and sysupgrade. I would have liked to use HTTP for the Arch ISO as well, if the SSL configuration wasn't in the way. I could uninstall luci-ssl I suppose, but that seems a bit like a lateral move when NBD is working just fine.
I've been running with this router configuration for a couple of weeks now and it seems to be rock solid. It may need further tweaks because it seems reluctant to use swap, but at the same time the memory usage generally hovers under the 50% mark. Can't tell if that's because 512M is more than enough RAM, or the packages are just so conservatively configured that it needs to be told to use the rest. Regardless, the Netgear R7800 has proven to be a worthy successor to my older WNDR 3800.